Wednesday, March 23, 2016

Pixels

Pixels


Pixels is a short animated film about the video game characters and elements essentially, "invading" the real world. The film doesn't have a set story, but rather sets up very well crafted senarios of invasion. There is an instance of the space invaders turning taxi cabs into pixels, and Pac-Man riding along the metro eating stations, as he would eat the white dots in the video game. The 3D aspect of this film is something I would really like to learn how to do. The pixel effect is a breath of fresh air, I've never seen anything like it. One thing I am assuming the creators did in the creation of this film is create masks to place the special effects, and I recently learned how to do that a couple of months ago. The effects and cinematography was very well done. However, I would like to see a fully-developed story made out of this concept that isn't Adam Sandler's sad excuse for an adaption. I look forward to onemoreproduction's future creations. 


Jean, Patrick. "PIXELS / The Short Film." Vimeo. Onemoreprod, 10 Mar. 2010. Web. 23 Mar. 2016.


Tuesday, March 22, 2016

A Simple Man


   This is the result of the project I started back in first semester. My objective was simply to model a man, and animate a walk cycle. Due to time constraints, I wasn't able to finish modeling his ear and hair. He came out okay nonetheless. I didn't have much time to animate the walk cycle after modeling, so I went with a simple walk cycle.

   For coming up with the design of the model, I contacted my fellow animator, Erick Vidal, for a design. 
 
This is the design he came up with. Unfortunately, the nose and neck don't line up perfectly. I had to take this into account while modeling and improvise. I thank Erick for his time and drawing skills (they are much better than mine). I highly recommend working with him. As small animators, we are trying to create the best content possible, and working with a fellow upcoming animator is the best way to do that. 

I covered the modeling and weight painting phase in a previous blog post. Scroll down to read more!

Throughout this project I learned to save frequently due to the small chance of a project corruption, and to be patient. Taking time to learn how every step is done is key to improving as an animator.

If there was anything I could've done differently was to model the arms horizontally instead of vertically. This caused me many issues while rigging. Something I would've liked is more time, however that isn't always possible.

I did improve my skills as a modeler. However, I decided this isn't the route I want to take with animation. I really enjoy rigging, and it is definitely something I want to explore.

Overall, I wasn't satisfied with the end result. When playing the animation, the foot would glitch out at around 120 frames, and I had to work my way around it. The model looks awkward in some places such as the elbows and the gluteus Maximus, and he has solid ears! I will take the skills I learned and apply them in my future projects. 

This semester, I will explore the realm of motion graphics and special effects.

Subscribe to my blog for more original and innovative content produced by my fellow animators and I.


Tuesday, December 15, 2015

Semester Recap


Progress

It turns out that I bit off more than I could chew. In my project blog I made in the beginning of September I said that I was going to model a character, rig it (both facial and body), and texture it in Mudbox. Unfortunately due to my lack of experience and a numerous amount of problems (3 file corruptions, bugs, etc.) I was able only to model and partially rig my character's body. I had to learn how to use several tools that I didn't know how to use before such as the multi-cut tool, "insert edge loop," collapsing, beveling, and using Inverse Kinematics to rig. There was also a lot of concepts I was unaware of, like topology and the importance of quads. It was quite a bit of information to learn and apply quickly. I'd say I'm about 65% done with this project, but I'm glad I was able to learn from my mistakes and have the opportunity to work at my own pace to make this project the best it can be. I will talk more about this in the reflection.

Process

I had my fellow animator , Erick Vidal,  make me a reference image due to my lack of drawing skills. Here is the character my model is based off of.
The image came out slightly disproportional. Unfortunately, I did not notice until the deeper stages of modeling, so I had to adapt. My file had already corrupted 3 times, and I wasn't wanting to start over. I started out making the torso, arms, and legs, and I used a cylinder to make all of these components. I attached them together by merging vertices and using a number of the tools listed in "Progress" to ensure that the quads were created and kept, for they make more smoother and less troublesome animation and texturing. As the body was coming together, I had an error with texturing, and in trying to fix it, the file corrupted. I didn't make a back up, and I lost about a week's worth of progress. I made it up in about 4 days. Then, when I arrived at more or less the same spot, both the original file AND the backup corrupted. Another four days were lost. Two days into making up the second corruption, the file and its backup corrupted again. Lucky, this was the last time this would happen. It took me about 3 and a half weeks to finish the body. It's late October. 

I made the mistake of modeling the arms vertically instead of horizontally, which would come to haunt me later when rigging.  After taking a day or two to polish the body, I went on to making the head. Making the head was probably my favorite part about making this model. I learned so much and it was incredibly rewarding to see progress. I countered small bugs and problems, but I managed to solve them on my own for the most part. 
The ears were a bit challenging, but I managed to complete them in about 4 days. They came out alright. It's late November, and I am just now starting to rig. This is where the bugs really start to come in. After I set up my joints, I began to parent controls to the IK handles, but for some reason Maya did not want to acknowledge this. The controls essentially did nothing. I asked my Animation teacher, Mr. Netterville, and he could not figure it out. I continued my work and found that Maya had decided to re-orient joints to the most bizzare positions. I asked a senior named Zack, who is experienced in rigging, and he could not figure out the problem. It was more frustrating than the file corruption to be completely honest. 
The control is not moving the IK handles...
After searching for various solutions, I decided to use a "Human IK" rig that Maya provided to rig my character. Here is where modeling my character's arms vertically came back to haunt me. Human IK requires arms to be modeled vertically to minimize issues and guarantee a clean rig. I skinned the rig to the model, and everything came out fine, except the arms. When the arms rotate there were a lot of issues painting the weights to make it look natural. There was always be some sort of inhuman attribute to his movement. It took me about 10 hours to paint weights, I spent around 3 or on the shoulder area itself using trial and error to make it as natural as possible. I had to use the smooth component of the paint weights tool to make it look somewhat natural.

I can say that now I have painted the weights to the best of my ability, and second semester I'm going to come in hitting the ground running, set up the controls and animate this guy. 

Reflection

Looking back, I feel like I took a very long time modeling my character. However, this was my first real character model, and I wanted him to be very very detailed. I think I did a decent job modeling him considering it was my first model, and to be completely honest, I don't enjoy modeling. I find it my weakest point in animation, tedious, and somewhat dreadful. I wanted to learn how to rig and texture. Even though it was very frustrating, rigging was very fun for me. It was peaceful and relaxing.  
   The cool thing about my animation class is that it lets you explore and work at your own pace so you can learn the way you want to learn.  I was so glad to be able to work at my own pace. Even though I don't enjoy modeling, I feel like I've learned so much about modeling, from tutorials and from my mistakes. I'm so much better at it than I was before. I am on a FIRST Robotics team, and as a side project I am modeling and animating our team's logo. The logo took me about 15 minutes to model. Without this project, I feel like would've struggled modeling it because I ended up using a lot of the tools I was first unfamiliar going into this project. I have taken a lot away from this project that I will have to end up applying to future projects whether I like it or not. I can say that I've worked my hardest this semester. Coming into this class I felt like I was going to struggle. I did, but I improved greatly, and I'm happy. I need to be fearless and look into new areas and projects, no matter how intimidating they may seem. If I run into a problem, I just have to be patient and find a solution. I have definitely grown as an animator this semester.


Looking Ahead

Next semester, I am planning on finishing this project, as well as working on various side projects for my FIRST Robotics team. If time permits, I really want to look into special effects and some 2D animation. I really haven't found my niche yet, so I need to keep exploring. I am willing to look into as many areas of animation as I need to find yet. As of now, the area of animation I enjoy the most is rigging, however, the most rewarding is modeling. It feels AMAZING to finish a model. Looking farther ahead, I want to create something memorable, something unique, something that defines me, before I graduate. That is the ultimate goal.


It's been a semester full of ups and downs, but overall it was a fun ride. I learned so much this semester alone compared to the time I spent in Maya my sophomore year. I am really looking forward to expanding my horizons in the world of animation this coming semester. I can't wait for what's to come (Even its more file corruptions... I can just do it over again for more practice).


Wednesday, December 9, 2015

Rigging: Basics of Painting Weights


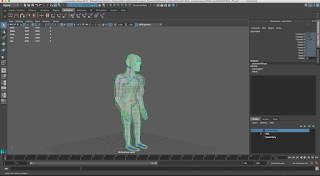
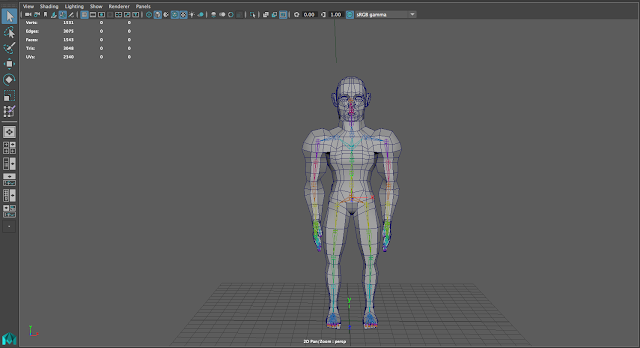
Hey guys, in this blog I'm going to talk about the basics of painting weights on a rig. In the left  image I have my model with  a rig skinned to it. If you have a rig but haven't skinned it to your model yet, you can skin it by going to the drop down menu on the upper left and selecting the "Rigging" option. From here go to the top menu, and select Skin->Bind Skin. 

This is how your model should appear when skinned. The joints should be in a rainbow like patter and the edges of the model rather dark. The weight tool allows you to control what joints control what part of your model. You paint these weights, and they can either restrict movement or allow a join to control a part of the model. Lets get into using the "Paint Skins Weights" tool.


The tool can be found under "Skin-> (Weight Maps)-> Paint Skin Weights."


The Tool will appear on your side toolbar as a square with a purple paintbrush. Double-click the tool.


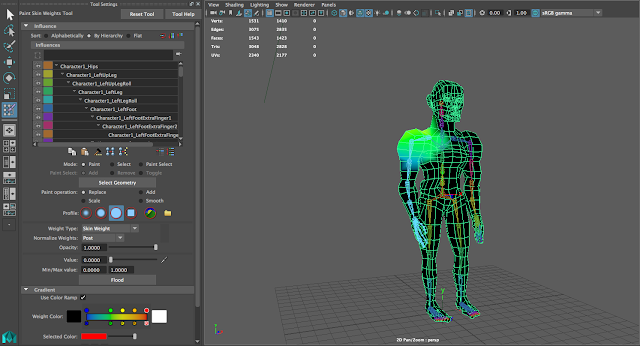
Here we have the Paint Weight interface. There are several options located in this interface that we will go over later. Joints that can be painted will be located under influences, but if we notice, there are no joints found. Why? We need to select our model first, and then go to the paint weights tool.


Now that we have our model selected, we can see the list of joints inside our model, and the area they affect. In this case, I have the joint where the right clavicle should be selected. We can shades of color in near this area. This is the area this particular joint controls when moved. The shades of color resemble how much of this area is being controlled on the scale of black being 0% control, and white, being 100% control.


The blue resembles little control, and the red is near 100% control. For this "tutorial" we are going to go ahead and turn color ramp on. It's more vivid, and allows you to have more control over your model.
This is the join hierarchy. We can select joints and see what areas they affect here.


I am not going to go too in depth with this tutorial, so I will only explain the "paint operations," "value," and the first 3 "profiles."  When you start to paint your paintbrush will have a value set. When you paint, you are technically painting a value over the model. 0.0000 is no influence, and 1.000 is 100% influence. You can select ranges between these values and give some control to the joint. It really depends on what you need. Replace, under paint operation, replaces a value already set on the model with the value on you paint brush. I select a joint, and lets say an area on my model had .5 value, and I want that joint to have no control over that area so I set my value to zero and paint over that .5 area. The color will change to black, and the join no longer has control over that area. "Add" adds value to an area, pretty straight forward. "Scale" subtracts value from an area, and smooth more or less evenly distributes the values, making the paint smoother. You want to try and paint the area around the joint, and get rid of areas that are far from it.


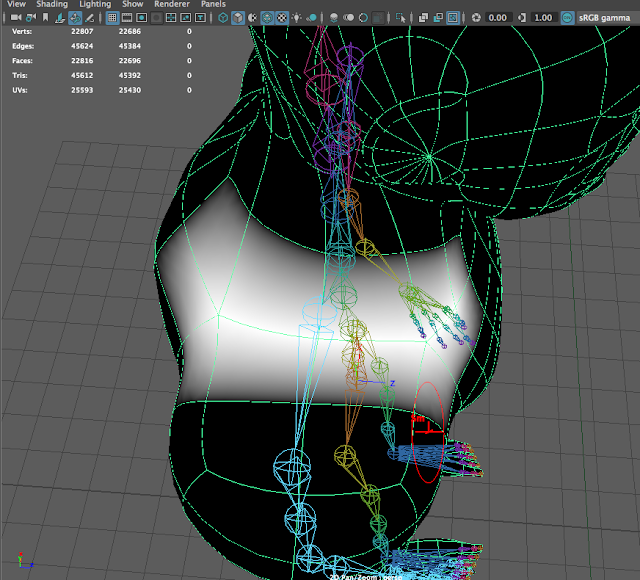
Ok, so now here I have my model, with the clavicle joint selected (in light blue). My brush is a red circle with a triangle like shape in the center. My brush has a value set to zero. Watch what happens when I paint over the shoulder with green.


The area turns black. This shows that the joint no longer controls the side of the shoulder. Notice how my brush got larger. You can hold "B" and drag your mouse to change the size of your brush on the fly.


Here I finish painting over the upper part of the shoulder, but wait. It seems as if I have removed the area around the joint. I want to give it full control, so I am going to add a value of 1.000 and paint over the clavicle. Before I go to the side menu and change the value, there is a way to quickly switch from a lower value to a higher value. Hold "Cntrl" and paint. This changes the value to the "inverted" value, and allows you to paint with it as long as you have "control"selected. For example. My value is 0.000. The inverted value would be 1.000. What Maya does is it takes the inverted value to be the value you have set minus 1. It is a time saving shortcut that is noteworthy.


As you see here I have finished painting the weights around the clavicle. The joint selected will now control the faces in white when moved. This tool is incredibly important for animation, because it allows for cleaner movement and therefore cleaner animation.


Monday, October 12, 2015

An Animator's Fear

                             "Fear plagues every creative person to some degree..."

    I recently encountered an interesting article on Lynda.com, a database used for technical tutorials, written by Dermot O' Conner that talked about animators and their fear to be creative. This fear makes you scared to finish a project or even start one. Conner underwent this fear. He calls it a "demon," or an "insecurity complex." It leaves animators mentally phased. Work is hardly ever finished or shown. This leads to the animator never experiencing their own potential. Conner explains that when he was working as an assistant for a head animator, he would start to draw, but after the first line he would rip up the paper and start over because feared of failure. After two years he developed an insane mental block. One that took time and a little inspiration to over come.  The article states, "you must be self aware about how you approach you work, and do so in a healthy manner." I cannot stress enough how true this is. I often find myself in the same situation. The mind is an extremely powerful tool and has a large influence in events that happen in our daily lives. Being a rather young and inexperienced animator I have not found my niche in animation. I really have no idea what I'm good at in this field. As a result, I sometimes start work scared of failure, or even frustrated at the fact that I don't know what I'm good at. I get stressed and upset because of my inability to master certain concepts, such as modeling. I find myself sometimes dreading work or unmotivated to continue my projects because of fear of future failure. With this recent project, I have encountered a numerous amount of problems that have led me to fall behind, including the corruption of my project not once, but twice... This fear has really taken away my ability to animate to my full potential, and this article has helped me realize this.

     Conner talks about the method that helped him overcome this fear. Disney animator Shamus Culhane encountered the same fear when he was working on Snow White. Culhane's "cure" was to work fast, without worrying about the details. He got the idea on paper, and technically polished it later. His method involved changing his way of thinking. Instead of, "I am unhappy with my work it is terrible I'm going to start over," he goes to, "Alright, I have this idea, I'm going to see how I can make it come to life and improve my skills in this process. Failure is not an option." Problems are going to arise every once in awhile. It is inevitable. The way one thinks through these problems is how one learns and strengthens their skills. During these last two weeks of being plagued with technical errors, I have learned more about Maya and my technically skills improved. Conner says to "just do it." No matter how inexperienced you are, try it, and see what you can learn. This is exactly what I need do to in order to improve. I need to stop worrying about failure or my inexperience. I need to try and learn. I need to learn from mistakes and error. I need to over come this fear of being creative. I need to believe in myself. I need to BE myself.  Design what I want to design. It is that simple. Free your mind from the creative demons that lie in the depths of your subconscious. That is how one is successful. O'Conner's article helped me realize this. If you haven't already, give it a read.
http://www.lynda.com/articles/an-animator-conquers-his-fear

Thursday, September 10, 2015

A New Project

Disclosure Face
As I begin to delve in farther into the world of animation, I have decided I want to explore 3D facial rigging and animation. For this project I came up with the idea of animating a simple walk cycle, and at the end having the character speak something. It isn't much of a story, but I really want to sharpen my skills in this area. I am not much of a modeler either, and I don't like it, but by modeling a human I can learn a thing or two about it.

         
Nathan Drake from Uncharted
     The inspiration from the facial rigging really came from two sources. Video games, and a EDM group called Disclosure. I really like rigging in general and I am really interested in learning the process of facial rigging. I want to make my animations speak. Disclosure has this face set up on the projector behind them lip syncing the words to the songs. I saw a video of a live concert and that also inspired me to start exploring this area of animation.
                                                                   
Basic walk cycle
I am also really wanting to learn how to animate a basic walk cycle. This is something I've never done before, and I feel like it is an essential skill to have as an animator.


Mudbox
    I also want to learn how to texture in Mudbox. Mudbox is used to make super precise textures. I am not much of an artist, but I really want to learn how to give life and colour to models.


   The idea/story for this project will be simple. I'll have a person walk over and pick up an object(maybe a ball or a stick). Then, he will look to the camera and say something. I just want to practice my rigging and my texturing skills. Since this is my first try at making a walk cycle I'm sure I'll encounter problems, but I will try my absolute best.


Sunday, September 6, 2015

One Man Band


The animated short film, One Man Band,  created by Pixar tells the story of two musicians trying to win over the donation of a small child. The story was really well told. The plausible impossible played a huge role in this film, and it was fun to see how it all played out. There was no dialogue. The story was told in the entirely of music, actions, and facial expressions.

Examples of the plausible impossible in this film were the musicians, equipped with their arsenal of instruments, and the young child, with musical skills of Mozart. Toward the end of the film the child loses his gold coin that he/she was going to donate, takes a violin, and wins a bag FULL of gold coins. Realistically, that won't happen right away, but it was very funny to see it happen immediately because it led to lively expressions of jealousy from the musicians and it really moved the story forward. The sudden change in expression in all of the characters, especially in the child, were key in telling the story. The expressions allowed me as a view to really understand what the characters were feeling. I really like how Pixar exaggerated character elements and situations in this film. It gave the film a sense of humor and life. One element in the story that I want to apply in my future works was the use of facial expression. I love the way they were used and I really want to become a master in the area of facial rigging. One element in this project that I have already learned how to do is texturing and rigging the body as a whole. I enjoy doing both of these. Despite no dialogue, the creator told the story well using facial expressions. While 3 characters was enough to tell the story, I would've liked to see some bystanders in the story. I am curious to see how pixar would change the story then. Overall, I really enjoyed this Pixar short and it will be considered one of my favorites. I still remember watching this short after 10 years and I still really enjoy it. If you haven't already, give it a watch.
https://vimeo.com/15914491